Stucco and Stain – Part II

image-2

Sixty-five windows. Two gallons of stain. Two gallons of Danish oil. Six sanding pads. A box of 100 rubber gloves. Hundreds of screws and hardware. Three tins of paint thinner and lacquer thinner. Two bags o’ rags. Two brushes, two gals, one husband and two professional Pella staining “teachers.” That’s what it took to complete our window-staining project on Nov. 8. But we’re done!

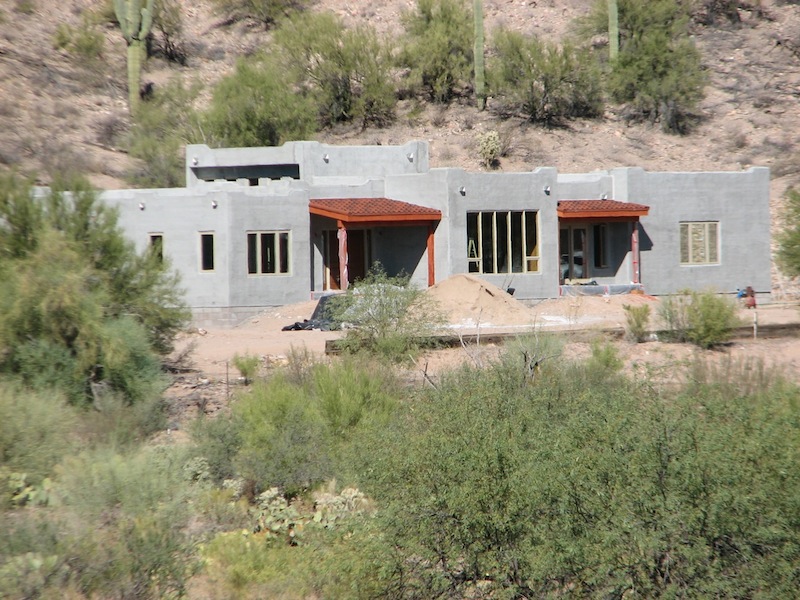
And our second coat of stucco – the brown coat – was completed Nov. 10. On Monday, Nov. 16, our final color coat is supposed to be applied (the two-week cure time was overkill, so we opted for one week of cure time and watered down the house 2xs per day for ample curing time). Visit our November 2009 Construction photos to see both our stucco progress and our staining progress. And feel free to leave us a comment by clicking the “Comments” links below each blog.

Scroll for sample images below.

IMG_9445

image

image-1

Stucco and Stain – Part I

IMG_9434

Our first coat of stucco – the scratch coat – was completed Oct. 28, and for the next three days, we sprayed down the house to harden the base coat. On the second day of ‘house watering,’ the interior also saw some action as my mom and I began window staining. Wow … those windows have a lot of hardware and assembly. Thankfully, we had a professional painter who specializes in Pella windows working with us the first two days. Now, thanks to his guidance, we’re on our own – power tools, paintbrushes and lacquer thinner in hand… Oh yes – and with Steve’s muscles to take the larger windows out and reinstall them for us.

Visit our October 2009 Construction photos to see both our stucco progress and our staining progress. And feel free to leave us a comment by clicking the “Comments” link below.

IMG_9424

Lath Complete

IMG_9325

Our house now has some color! Lath (tar paper and chicken-wire) was completed on Oct. 20, and the next step in the stucco process is the scratch-coat. Our giant pile of sand and Western One Kote (scratch coat) awaits! We’re applying stucco in a three-stage process that involves two week’s cure time in between each stage: scratch coat, brown coat, then final (Dryvit) coat. By the time the holidays are over, the outside of the house should have a ‘finished’ feel to it. Don’t tell anyone that the inside isn’t even close to being complete. Check out the October Construction Photos.

Thank you for your patience as we continue to recreate the website (you’ll see we added some construction videos back, and we’ll be working toward re-uploading our old flora/fauna images, etc.) Feel free to leave comments within each blog post.

Porch Overhangs Ready! Next Step, Stucco.

IMG_9113

Our apologies for the temporary website unavailability. Unfortunately, though, we lost the entire Fry Ranch website, my brand new work website and my old website when our host’s servers were ‘hacked.’ The company then decided to go belly-up the next week, providing NO backups for any of our pages (or refunds!). So Steve has been tirelessly working on completely rebuilding and improving this site. We hope you like it. And – oh yeah – he did all of this while building all the porch overhangs on the house.

In mid-September, Steve began installing ledger boards and posts as the first step on our four porch overhangs: front door, office, master bedroom, dining room. On Oct. 11, he officially finished the very detailed porch project that included 70 pieces of tongue-and groove, six gallons of stain, more rough-sawn lumber than we could image, 100 sheets of metal roof tile and accessories, hundreds of screws and lots of sore muscles. Special thanks to neighbor, Mark, who helped us get a man-powered crew in to lift the giant header beams instead of a crane. Next step is stucco!

Take a look at our September construction photos for wood staining, manual-beam-hoisting, joist placement and fascia boards. View October construction photos for final details, tile and electrical box placement.

IMG_9150
IMG_9235

Hello and Goodbye

Love my eyelashes

It was with great anticipation that we awaited the arrival of the baby roadrunners that were soon to fledge from the nest they had built in the garage. Just walking into the garage sent them into serenade, hissing and eventually learning how to make their little “blurp,” “blurp” sounds. So we knew they were growing. However, we were careful not to interfere with nature throughout the nesting process and kept our distance … a big, difficult choice for me, especially later.

To our dismay, however, the “newbie” parents had stopped feeding the babies with any sense of frequency and didn’t even come around the day that Rocky (the first baby) broke free of the nest. That night, he found shelter under one of the rocks along the rock wall, which was warm from the sun and good protection from predators. However, the next morning, we discovered him under the rock, just barely hanging on.

I took him into my hands and held him to keep him warm, but to no avail. It was a very emotional moment for me – I kind of felt like their mom after all the doting I had done, and having made Steve build platforms for them, set up a roadie cam, etc… So when Rocky literally took his last little breath in my hand, the waterworks ensued. He simply wasn’t nourished or taken care of after leaving the nest. Rocky’s sibling, sadly, had even less of a chance, dying in the nest – again, it appears from lack of nourishment.

Trying to console me, Steve reminded me that what I experienced was truly a gift, albeit heartbreaking. But as Steve said, I was lucky, even in the end: to have been that close to nature, to have even seen a baby roadrunner (a true rarity). Most people just don’t have that opportunity. I just hope that the next time around, we’ll have a happier ending. While I don’t want to mess with nature, I may just have to have an eyedropper and fresh bugs on hand next mating season. Please enjoy these rare close-up photos and videos we were able to take of our short-term friend.

See Previous Blogs

Welcome to Roadie-Cam

IMG_8816

With 110-degree and higher temperatures, our building progress has been on hold while we plan for concrete, porches/patios and stucco during cooler weather. However, construction hasn’t halted completely! Our new residents in the garage have been picking up the slack and building away throughout June. When we first discovered our new inhabitants, we thought rats were responsible for the pile of twigs, until we saw a roadrunner saunter in with twigs in its mouth.

The pair tried for weeks to build their nest on a narrow 2×6, but the twigs kept falling to the ground – until Steve built them their first platform at about 3 feet (at my urging). Even though they spent a day transferring their twigs to that platform, the roadies came back a few days later, gravitating up into the 2x6s again – near the rafters. So Steve built the second, higher platform, which they’ve adopted as their home (until we put a garage door on). They’re great at killing rattlesnakes, scorpions and other insects, so we’re happy to have them while they nest. They’re quite accustomed to us as well.

IMG_8818

Roadie in RR tie

Ummm…. White Castle

Fry White Castle

Anyone who knows Steve knows that he is in love with White Castle sliders (mini-burgers popular on the East Coast). So – now that the house is wrapped in Tyvek and resembles a white castle due to the angular parapets, his eyes glass over, and he salivates every time he pulls in the driveway, murmuring dreamily, “Ummm…. White Castle….”

So – in between hunger pangs, we chose a stucco crew that wrapped the entire house in Tyvek. The roof crew also finished up, and our window installers worked tirelessly in 103-degree heat to “dry us in.” We did it! We beat monsoon season, and we now officially are waterproof with all windows and sliders in operating order.

Melissa was devastated when her hummingbird pets continued to get caught in the house. Their traditional window openings – which they’d been using for months – suddenly were covered in glass, and once entering through the still-open door pockets, they couldn’t figure out how to escape. Steve had to rescue the hummies with a plastic bucket, the poor tuckered out guys!

Check out our progress under New House Construction June 2009 and the great fast-forward daily progress videos on “New- Construction Timeline.”

IMG_8758

Mad Dash to Beat the Monsoons

IMG_8326As we inch closer and closer to Arizona’s official rainy “monsoon” season (mid-June), we have come to realize that trying to finish the roof install and parapets ourselves is too great a risk… Unless, of course, we want bucket loads of water falling on all our hard work. So – kicking and screaming – we agreed to hire a framing crew for assistance (we prefer to do our own work). Even with a four-man crew, and Steve working alongside them, it has taken days. And, as luck would have it, the very first day of roof panel placement, you guessed it … RAIN! But fortunately, it only got the crew wet once, and the torrential downpour lasted for only 30 minutes. We’re hoping the kitchen space will feel less expansive once we get cabinets in, but with 14-foot walls, it’s feeling a bit overwhelming. All the more space for Steve to cook in! Check out the our May Construction Photos.

Framing, Cranes & Muscle Pains

IMG_8034Here we are into May already, with April’s whirlwind of activity behind us. Amid splinters and sore muscles, we worked throughout April on interior framing – finally seeing the rooms take shape. We even added a few vigas to the entryway! Toward the end of April, we rented a “Genie” lift to move the exposed “Glulam” beams into place – a piece of equipment that turned out to be anything but magical or wish-granting. While it helped us get beams up on the top plates of four rooms, we finally called in the big boys –crane operators – on May 1, to help with the larger beams. And, thanks to Charlie, our neighbor from Phoenix, we were able to get all the beams spaced/toe-nailed in, and the mini top-panels in place as well. We’ll tie up loose odds ‘n ends over the next few weeks with the goal of roof panel placement soon – again, with the big red crane. Check our April and May Construction Photos.

Back in Business – Interior Framing Begins

IMG_7836

Although it may not look like we’ve made much progress since our impressive six-day wall raising in February, the past three weeks have been spent completing the unglamorous tasks of framing all the window openings and adding headers and top plates. On March 28, we were able to dive in to a task that actually shows some progress: interior framing. We’ll continue to post photos of progress – and images of unwitting friends who “think” they’re coming for rest and relaxation in the desert, but who find themselves hefting lumber and playing with power tools (special thanks to Lindsay and Tami from PA, and Dave from Phoenix!)